U-Filter User's Guide
U-Filter by Ultinous filters alarms using image-based AI filtering, eliminating false alarms. This guide will walk you through the steps necessary for setting up image filtering via the U-Filter web interface.
Required steps
Setting up a working U-Filter environment involves the following steps:
- U-Filter is installed and has an active license.
- Configure Sites and Channels, described below.
- Create and assign users to Sites.
- Setup and associate your cameras with U-Filter.
Your company should already have provided you with an account approved by Ultinous. Login to the U-Filter web interface to begin the configuration process.
To learn more about receiving an account approved for U-Filter, contact sales@ultinous.com.
Configure Sites
Every stream handled by U-Filter is grouped by a Site, representing their physical location. The following section describes how to create one - repeat these steps for each Site you would like to create.
- Click the Add New Site button in the upper left corner of the screen.

- Fill in the following fields with the data provided by your organisation.
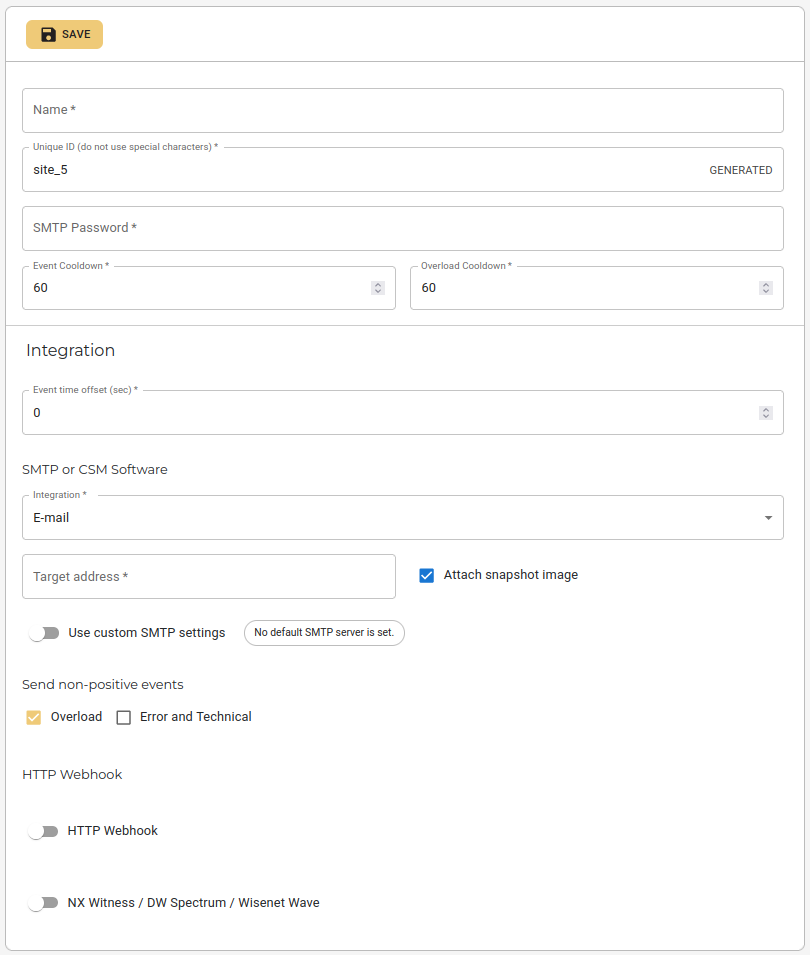
- Name: The name identifying your Site.
- Unique ID: The unique technical name of the Site, used to identify your site in integration and third party services. Must be unique across all Sites. Must not contain special characters. An ID is generated by default (can be modified, cannot be changed once saved).
- SMTP Password: The password used to authenticate U-Filter when configuring your cameras.
- Event cooldown (in seconds): The minimum amount of time that has to pass between analysis periods. No e-mails will be sent during this timeframe. 60 seconds by default.
- Overload cooldown (in seconds): In case the U-Filter server gets overloaded with requests, this parameter controls how many seconds has to pass until new ones get accepted from the channel that caused the overload. Requests from other channels are unaffected. 60 seconds by default.
- Event time offset (optional, in seconds): The amount of seconds to be added to the event timestamp included in every e-mail and integration (such as the
timestampvalue in HTTP integration). Type a negative value if you wish to subtract the given amount instead.
SMTP or CSM Software
- Integration: Select the type of service you would like to use U-Filter with. E-mail is selected by default.
- Target address: The target address to which you would like to receive images filtered by U-Filter. Type a valid e-mail address associated with the service chosen above.
NOTE: In case you would like to use U-Filter in conjunction with a third-party service, select the service from the drop-down menu of Integration, above. Then type the e-mail address provided by the service into the Target address field.
- Attach snapshot image: Tick this box to send a snapshot image of the incident attached to the e-mail containing the event data, in
.jpgformat. - Use custom SMTP settings (optional): Tick this button to overwrite your global SMTP configuration set in the Admin Panel or set up a new one (only applies to the current site).
Send non-positive events (optional)
You may be interested in receiving non-positive event data, which could come in useful for statistical and testing purposes. U-Filter can optionally send such events, if enabled here. Otherwise, U-Filter only sends Positive and Overload events by default.
Overload (enabled by default):
When the CPU resource of the receiving server reaches a critical percentage, U-Filter will reject receiving further email and puts the given channel into Overload state. By default, U-Filter will send an Overload event when the given channel is overloaded. Untick this button to stop sending Overload events.
Error and Technical:
Sends events such as "not a jpeg image" or "the image size is too large". Tick this checkbox to enable the sending of technical events so that they can be monitored and reviewed.
NOTE: Enabling technical events may put heavy strain on the Site's channels, if there is a high number of them. This feature can be enabled in the Administration Panel. It can, however, be disabled by any user assigned to the Site.
Negative Event:
Sends an event every time an image was analysed and no target object was found on the image. This feature can help evaluating the system's accuracy. Tick this checkbox to enable the sending of negative events.
NOTE: This is an administrator feature that only becomes available once the Allow negative events button has been ticked on the Sites screen.

Click Save or proceed with configuring event sending via HTTP.
HTTP Webhook (optional):
Enables / disables event sending via HTTP. Use this feature to send triggered events to a third-party software with an optional snapshot image of the incident attached. Sends an HTTP POST request to the URL set below, with a content type of application/json. See the U-Filter HTTP section of the guide for message schema.
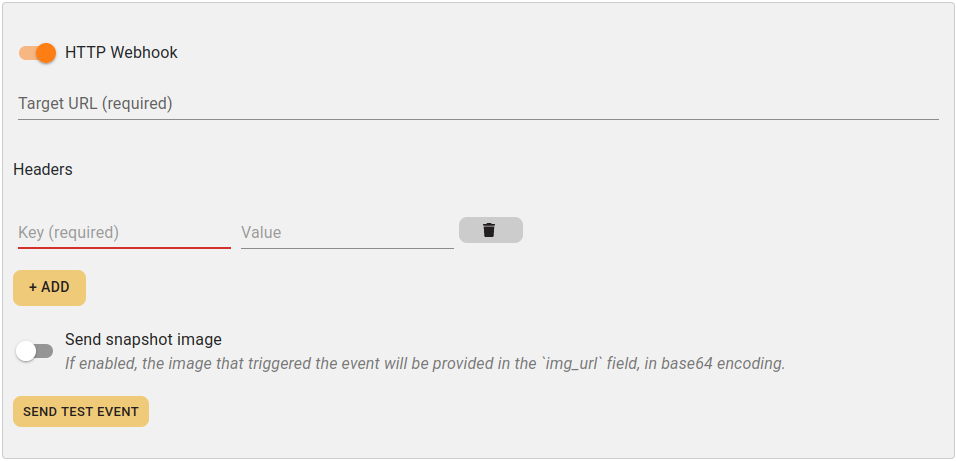
- Target URL: The location of the API.
- Header keys and values: Keys and values of custom HTTP headers. Click the Add button to add more Keys. To delete a Key, press the Trash icon next to it.
- Send snapshot image: Off by default. If enabled, it fills in the
img_urlfield of the HTTP message schema in base64 encoded format.
To test the HTTP Webhook, click the Send Test Event button once the Site is created.
Channels
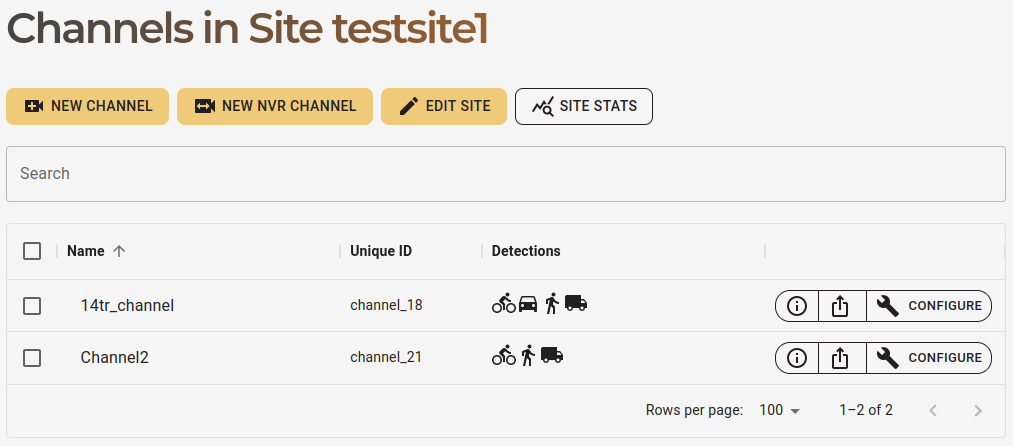
Once your Site is created, Channels can be registered, representing your camera streams. If you have a Network Video Recorder (NVR), it can be registered as an NVR Channel.
Configure a Channel
- Click on your Site in the table row that you would like to add a Channel to.
- Click the New Channel button in the upper left corner of the screen.
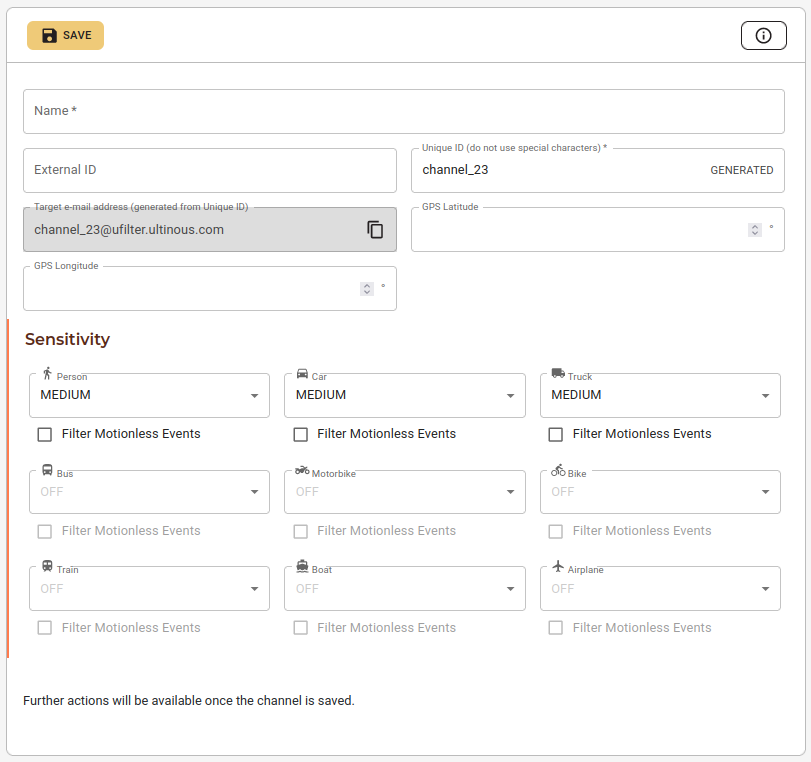
- Name: The name identifying your Channel.
- External ID (optional): You may define a custom ID value here, in case an external or third-party solution requires one to identify this channel with.
- Unique ID: The technical name of the Channel, used to identify it in integration and third party services. Must be unique across all Sites. Must not contain special characters. An ID is generated by default (can be modified).
- GPS Latitude (optional): The GPS latitude coordinates of your Channel.
- GPS Longitude (optional): The GPS longitude coordinates of your Channel.
- Choose any combination of objects you would like to filter. Select their sensitivity ranging from VERY LOW to VERY HIGH or turn their detection OFF. Lowering the sensitivity causes less false detections but decreases accuracy. Increasing it results in more detections but may include more false detections as well.
- Click Save, then click Back.
- Your Channel has appeared in the list of Channels of your Site. Click the ℹ️ button in the right-most column of your Channel.
- The following popup will appear:
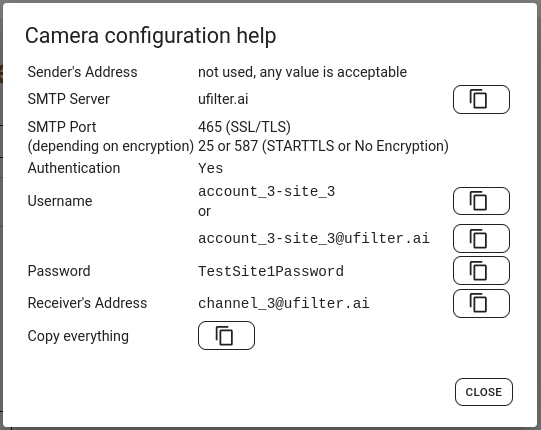
Use the information here to help you configure your camera's SMTP settings:
- SMTP Server: The SMTP address generated for the U-Filter Site.
- Username: The SMTP username for this Site, generated from the corresponding Site technical name and the account's technical names.
- Password: The password set for this Site. To change it, edit the Site by clicking Configure next to the Site name. Click the Generate New Password button. Click OK on the popup, then click Save.
If multiple recipients are provided by the e-mail sending service, only the last one is taken into consideration.
For custom SMTP server settings in U-Filter, contact your system administrator for configuration.
- You can test your settings by clicking the Upload button in the button row to the right of the Channel in question.
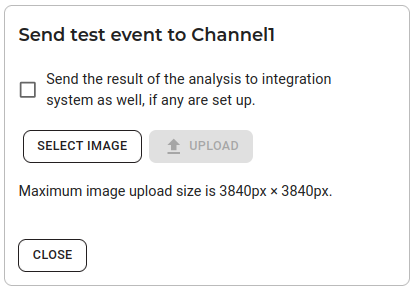
- Click the Select Image button to select an image file in
.jpgformat (other formats are not supported) to apply the chosen types of analytics. Click Upload. Tick the Save image on the server box if you would like to re-use the image later (e.g. for drawing areas, see below). - All done! You can either click Save and proceed to configuring your cameras, or optionally, configure your channel with additional filtering tools, described below.
Note that the maximum size of the image that can be sent via e-mail or HTTP input is 3840x3840 pixels. JPG is the only supported image format.
Configure an NVR Channel
- Click on your Site in the table row that you would like to add a Channel to.
- Click the New NVR Channel button in the upper left corner of the screen.
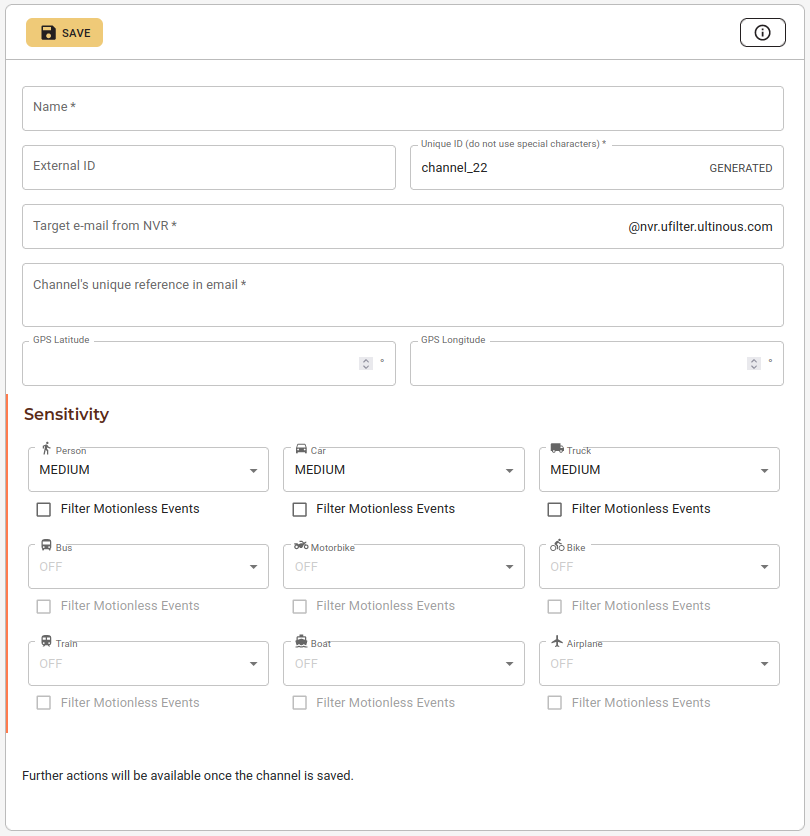
- Name: The name identifying your Channel.
- External ID (optional): You may define a custom ID value here, in case an external or third-party solution requires one to identify this channel with.
- Unique ID: The technical name of the Channel, used to identify it in integration and third party services. Must be unique across all Sites. Must not contain special characters. An ID is generated by default (can be modified).
- Target e-mail from NVR: Type an email address (the domain is already filled in): Use this address in the NVR when configuring an SMTP server for it.
NOTE: Each camera connected to the same NVR that you would like to use in U-Filter must be registered as NVR Channels with the same target e-mail address.
- Channel's unique reference in email: NVRs usually use one recipient email address. Differentiation of individual camera streams connected to the NVR is done via a unique reference contained in the email sent by each channel connected to the NVR. This should be a text string contained in either the body or the subject of the email sent by the camera stream, which is unique to that stream across all Channels connected to the Site.
- GPS Latitude (optional): The GPS latitude coordinates of your Channel.
- GPS Longitude (optional): The GPS longitude coordinates of your Channel.
Choose any combination of objects you would like to filter. Select their sensitivity ranging from VERY LOW to VERY HIGH or turn their detection OFF. Lowering the sensitivity causes less false detections but decreases accuracy. Increasing it results in more detections but may include more false detections as well.
Click Save, then click Back.
Your Channel has appeared in the list of Channels of your Site. Click the ℹ️ button in the right-most column of your Channel.
You can test your settings by clicking the Upload button in the button row to the right of the Channel in question.
- Click the Select Image button to select an image file in
.jpgformat (other formats are not supported) to apply the chosen types of analytics. Click Upload. Tick the Save image on the server box if you would like to re-use the image later (e.g. for drawing areas, see below). - All done! You can click Save and optionally proceed to configure your channel with additional filtering tools, described below.
Note that the maximum size of the image that can be sent via e-mail or HTTP input is 3840x3840 pixels. JPG is the only supported image format.
Additional filters
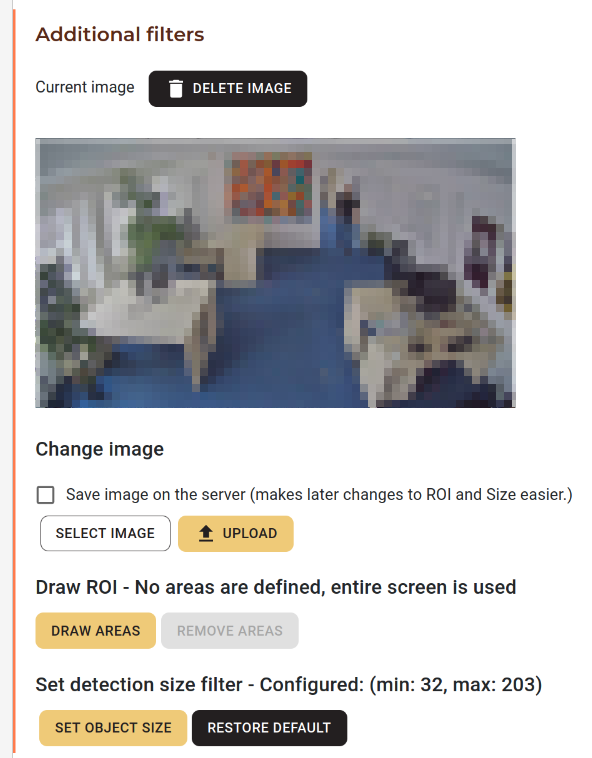
In order to further enhance or tweak detection accuracy, additional filters may be applied to images sent to U-Filter.
- Open the Channels page of your Site. Click the Configure button under the Detections column of your Channel.
- Scroll down to Additional Filters.
- Select an image to upload from your device: since this image will be used as a canvas on which ROI will be drawn or size filters can be applied, an image extracted from your camera feed would be ideal.
This image can be stored on the server by ticking the checkbox (selected by default), removing the need to reupload the image every time a change in ROI or size filters is desired. There are multiple ways to extract an image from your camera feed - for example by using a tool such as ffmpeg. You can use the command below to generate an image.
ffmpeg -i <rtsp_URL_of_your_camera> -vframes 1 output_image.jpg
- Draw Areas: click this button to designate one or more regions of interest (ROI). Read below to learn more about drawing ROI.
- Set Object Size: click this button to adjust the minimum or maximum object size to be detected. Read below to learn more about setting custom size ranges.
- You may click the Delete Image button to remove the uploaded image from the server, or click Select Image then Upload again to replace the uploaded image with a different one.
Make sure to adjust or reset your ROI and size filter settings if you replace your initial image with a different one.
Draw ROI (Region of Interest)
You can draw annotations on top of the scene observed by the camera to specify what areas (regions of interest) to include or exclude from filtering.
- Click the Draw Areas button to open the Ultinous Camera Editor and begin drawing areas. Multiple areas can be drawn.
- To remove all areas, click the Remove Areas button.
Read the Camera Editor guide for detailed instructions on drawing regions of interest.
Set detection size filter (optional)
If you have a good idea of what pixel range the detected objects would fall into, you can customise the minimum and maximum height size of detections, in pixels, here. This would ensure that only objects that fit into that range would get detected, resulting in a further decrease in the number of false detections.
NOTE: Take care that any object below or above the set range will NOT be detected, possibly resulting in missing incidents. It is good practice to set the minimum size slightly below, and the maximum size slightly above the desired amount.
- Click the Set Object Size button.
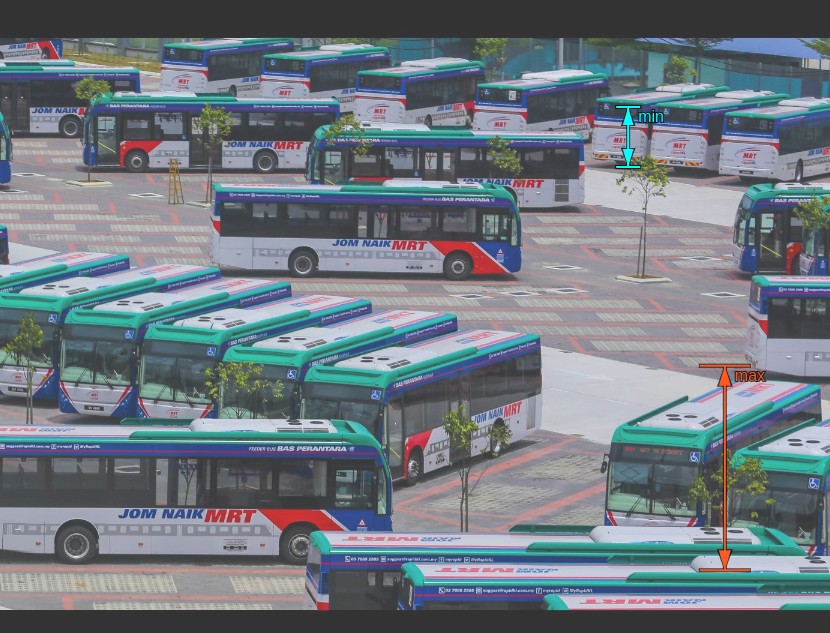
- Move the arrows by clicking and dragging them to help you determine the optimal values. Adjust the slider's endpoints on the bottom part of the screen to set the minimum / maximum values.
- Click Set sizes to save your changes, or Discard to cancel them.
Note that if you upload an image with different dimensions than the one already uploadeded, ROI and detection size filters will have to be adjusted for the new image dimensions.
Site Statistics
Once everything is set up and events start appearing, you may wish to review them within U-Filter.
- Click either the Stats button in the Sites screen, or the Site Stats button in the Channels screen.
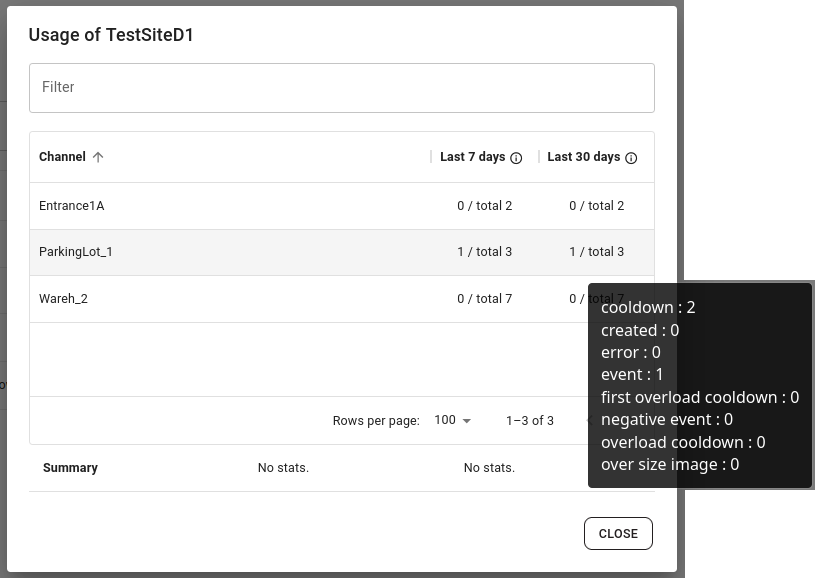
This table shows you the positive / total number of events received in the last 7 and 30 days, channel by channel. You can filter the results by channel in the Filter field. Hover your cursor over the positive event numbers to get a tooltip displaying all events, including error and technical.
Edit Site
- Click Configure in the Actions column of the Site.
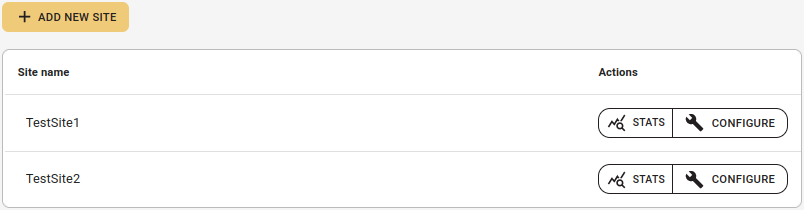
- Modify the settings to your liking, then click Save. To remove the Site, click Delete Site.
Note that SMTP data and the Site technical name can not be modified once the Site is created.
Edit Channel
- On the Sites screen, click the Configure button on the right of the Site containing the channel in question.

- Click the View Channels button at the Site's header.

- On the list of channels, click the Configure button on the right side of the row of the Channel in question.

- Modify the settings to your liking, then click Save.
The Unique ID and Target e-mail address can not be modified as they are generated automatically.