Cameras
You can add your cameras to Ultinous AI Suite and watch their live play here.
Click the Cameras menu on the left sidebar for this view.

Before you start
Please make sure that everything described in the First Steps is done and you have all these information for each camera:
The location / desired name of the camera
Camera RTSP address (including username and password if the camera is protected)
The current resolution and FPS setting.
Note: Make sure your camera's active infra range is aligned with the desired distance range.
Note: Make sure your camera's cover is clear. Dirt on it can heavily effect the night vision accuracy.
Understanding the detection range
The intrusion detection algorithm of Ultinous AI Suite can detect people in a wide distance range but the optimal person height range is between 30 and 1000 pixels. Because the algorithm always works optimally in the this pixel range, the effective person detection range depends on the camera resolution. Detection range can vary from 1.4 meters to multiple hundreds of meters. Ultinous AI Suite has successfully demonstrated intrusion detection at 400 meters' range using high level of optical zoom.
Examples:
| Vertical field of view (degrees) | Frame height (pixels) | max range (m) |
|---|---|---|
| 100* | 480* | 11.7* |
| 100 | 576 | 13.7 |
| 100 | 600 | 14.3 |
| 100 | 720 | 17.1 |
| 100 | 1080 | 25.7 |
| 75* | 480* | 18.2* |
| 75 | 576 | 21.3 |
| 75 | 600 | 22.2 |
| 75 | 720 | 26.6 |
| 75 | 1080 | 39.9 |
| 40* | 480* | 38.5* |
| 40 | 576 | 44.8 |
| 40 | 600 | 46.7 |
| 40 | 720 | 56 |
| 40 | 1080 | 84.1 |
*Note: These lines refer to moving cameras. Range depends on the level of magnification.
Add a new camera
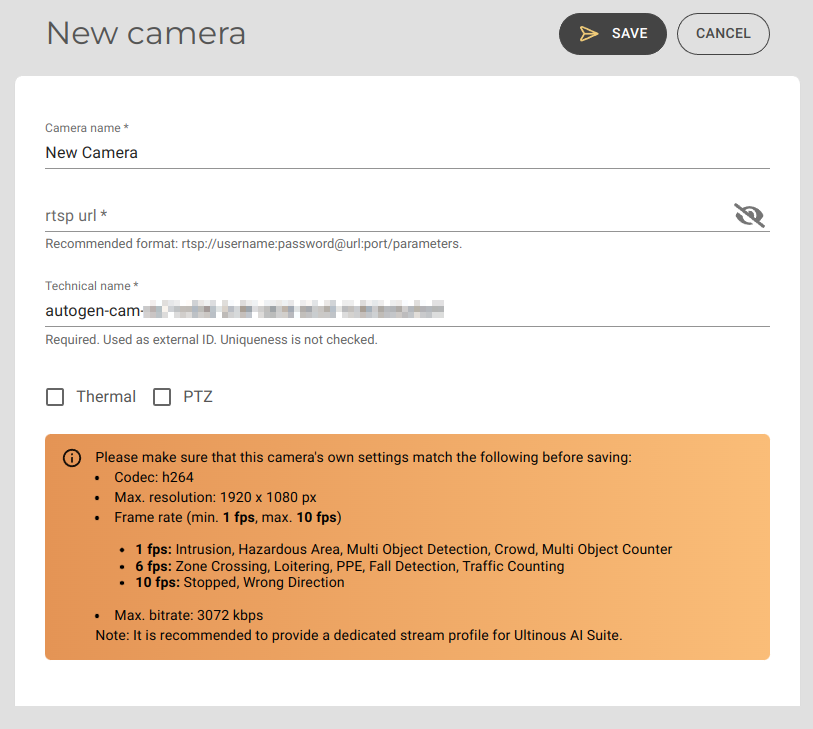
IMPORTANT: Make sure that this camera's own settings match the following before adding any cameras to Ultinous AI Suite:
- Codec: h264.
- Maximum supported resolution: 1920 x 1080 px.
- Minimum frame rate*: 1 FPS.
- Maximum frame rate*: 10 FPS.
- Maximum bitrate: 3072 kbps.
- Keyframe interval (sometimes called "GOP length"): 3 or less.
It is recommended to provide a dedicated stream profile for Ultinous AI Suite.
* The frame rate recommended for each solution type varies, according to the following:
| Recommended frame rate | Solution type |
|---|---|
| 1 FPS | Intrusion, Hazardous Area, Multi Object Detection, Crowd, Multi Object Counter |
| 6 FPS | Zone Crossing, Loitering, PPE, Fall Detection, Traffic Counting |
| 10 FPS | Stopped, Wrong Direction |
- Click the New Camera button. Fill in the form on the right side.

Camera name: This name should identify the camera for operator users (eg. Entrance 1).
RTSP URL: The location of the camera. The recommended format is rtsp://username:password@url:port/parameters.
NOTE: Special characters included in the password may cause issues, therefore it is highly recommended to omit using them. Otherwise, as a workaround you can 'escape' such characters by replacing them in the following format:
MyPassw@rd->MyPassw%40rd. Note the replacement of the @ character with %40.
Technical name: Ultinous AI Suite will automatically generate a technical name (denoted by the "autogen-" part): This will identify the camera in external services if the alarms are sent to a third-party software according to the corresponding document. In such use cases, it is recommended to rename this to something unique and identifiable.
Make sure that the camera has the same Technical name in Ultinous AI Suite and GUID in Milestone XProtect - otherwise the camera will not be recognised! See the Milestone XProtect section of the guide for details.
Thermal: Tick this checkbox if the camera is a thermal one.
PTZ: Tick this checkbox if the camera is a PTZ one or is otherwise capable of movement or zooming.
Click the Save button to register the camera.
After a few seconds, the new camera should appear in the Cameras list. The live view of the new camera is available after clicking on its name or preview image in this list.
Warning: Do not modify the resolution or the framerate of a stream after it is connected to Ultinous AI Suite. If the stream's settings are changed, Ultinous AI Suite will stop processing that stream and will be in unhealthy state in monitoring services used.
If a stream's settings are changed anyway, and the new settings are still compatible with Ultinous AI Suite, the processing of the streams can be restarted by clicking on the RELOAD ALL button below the registered camera thumbnails.
NOTE: It may take a while to load a preview image for your cameras. You can continue your work, the preview will appear automatically later.
In rare cases Ultinous AI Suite can not determine your stream's FPS and asks for confirmation whether your framerate matches the requirements.
Edit an existing camera
- In the Cameras list, click on the preview image of a camera.
- Click the Edit button above the camera's live view.
- Modify your settings. In this form everything is the same as when adding a new camera with the following exceptions:
- RTSP URL should be filled only if the URL is changed. For security reasons, the current username and password is not visible in the URL.
- Deleting a camera deletes all alarms, events and incident records which belong to this camera.
- Click the Save button to apply the new settings or Cancel to discard your edits.
Delete an existing camera
NOTE: Deleting a camera deletes all alarms, events and incident records which belong to this camera.
- In the Cameras list, click on the preview image of a camera.
- Click the Delete button above the camera's live view.
Camera Live view
In the Cameras list, click on the preview image or the name of an existing camera. The live view will load in a few seconds.

Display features
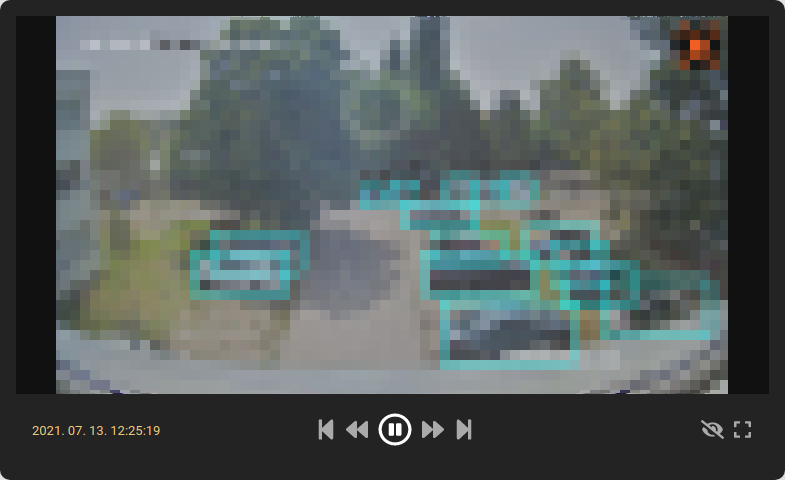
- If a Solution with ROI is associated with this camera, positive / negative ROI are displayed as green / white polygons.
- Detections inside the ROI (or if there is no ROI) are solid orange / aqua polygons, depending on the detected object type. Their object type is denoted above the polygons. In the label next to it is the 'detection score' - the number that tells you the strength of the detection. This is influenced by the Sensitivity rating of the Camera associated with a Solution. You can learn more about fine-tuning this in the Expert Settings part of the guide.
- If an alarm is triggered, a Bell icon will appear in the top right corner of the player.
- The timestamp of the video is at the bottom left corner of the player (can be different from the one that comes from the camera) in the timezone of the device. The timezone can be modified in the Control Panel.
Controls
||and>toggle between pause and play|<button rewinds to the earliest available video>|button jumps to live play<<button jumps backward ten seconds>>button jumps forward ten seconds- The Eye button shows / hides annotations
- You can go to full screen play by clicking the Rectangle button in the lower right corner of the player
Troubleshooting

If something is wrong with the configuration of any of your cameras, Ultinous AI Suite has several indicators:
- A red "warning" badge on the Cameras button on the left-side panel
- A clickable red "Error" message on the malfunctioning camera
- A clickable notification bar will appear at the bottom right corner
Clicking the "Error" message or the notification bar will navigate you to the System Health page of the Control Panel, where information regarding the camera's health status will appear to help you investigate the issue.
Next steps
After the registration of your cameras, you may continue by setting up Solutions.