Intrusion

An Intrusion alarm is triggered whenever a person or ground vehicle is detected in a restricted area. It has high accuracy and low false alarm rate even at long range and with different light conditions.
Core technology: full body and ground vehicle detection.
Full body detection distance and accuracy is high, compared to head detection.
Available classes: person, car, bus, truck, motorcycle, bicycle
Compatible with fixed, PTZ, and thermal cameras.
Areas of interest can be defined.
Send alarm notifications to third-party software.
New Intrusion
- Choose Intrusion by clicking on its box. Fill in the form, as follows:
- Name: A readable name of this alarm. This name will appear in the Events view and in all notifications.
- Armed: The alarm can be deactivated here. Armed by default.
- Schedule (optional): You can associate one of your previously defined Schedules with this alarm.
- Filter motionless objects (optional): Tick this button to exclude unmoving objects from being detected. Useful if you don't wish parking cars, for example, to trigger alarms.
Note: Using PTZ cameras in conjunction with motionless object filtering is not advised as this feature is designed with a still background (and therefore, fixed cameras) in mind.
- Add Camera: Select a camera from the list.

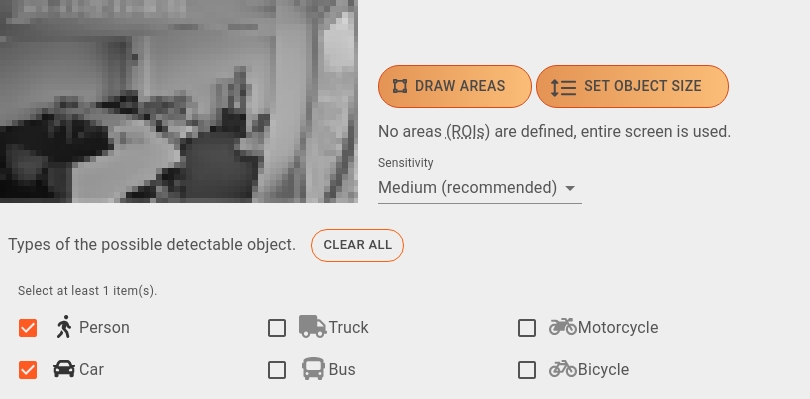
- Draw Areas (ROI) (optional): Sometimes the alarm should be limited to a specific area of the video. If you would like to observe only a specific area, it can be determined here. Clicking this button makes the Camera Editor appear. Without ROI, the entire area will be observed.

Set object size (optional): If you have a good idea of what pixel range the detected objects would fall into, you can customise the minimum and maximum height size of detections, in pixels, here. This would ensure that only objects that fit into that range would get detected, resulting in a further decrease in the number of false alarms.
Move the the arrows by clicking and dragging them to help you determine the optimal values. Adjust the slider's endpoints on the bottom part of the screen to set the minimum / maximum values. Click Set sizes to save your changes, or Discard to cancel them.
NOTE: Take care that any object below or above the set range will NOT be detected, possibly resulting in missing incidents. It is good practice to set the minimum size slightly below, and the maximum size slightly above the desired amount.
For example: If using Ultinous AI Suite with a combination of radar and PTZ cameras, setting custom object sizes would result in detections only if the radar have detected movement - since setting the proper minimum size would rule out random noise causing false detections.
Sensitivity : The sensitivity of the detector can be fine tuned here. Lowering the sensitivity causes less false detections but decreases accuracy. Increasing it results in more alarms but may cause more false detections as well. The default sensitivity is Medium.
Object types: Choose any number of object types from this list (Person by default). Click Clear all to reset your selections.
Cooldown: After an alarm is triggered, it won't be triggered again for the specified duration.
Enable HTTP webhook (optional):
Enables / disables event sending: Use this feature to send triggered events to a third-party software with an optional snapshot image of the incident attached. Sends a HTTP POST request to the URL set below, with a content type of
application/json. Read on to learn about the schema formatting. It is also possible to include an End of Event timestamp, which triggers if 5 seconds have passed without incidents after the initial event that triggered the HTTP message. End of Event occurs once the incident is over.The following information should be provided by the third-party software's administrator:
- Target URL: The location of the API.
- Header key and value: Key and value of custom HTTP header. Click the Add button to add more Keys. To delete a Key, press the Trash icon next to it.
- Trust all certificates: If enabled, HTTPS certification errors will be ignored.
NOTE: Custom CA certificates can be uploaded in the Trusted Certificates setting.
- Enable snapshot attach: Off by default. If enabled, it fills in the
snapshotfield of the http message schema in base64 encoded format. - Send end of event: Enables / disables End of Event sending. Note that the Cooldown setting of the Alarm has no effect on this.
Send Test Event: To test your integration, click the Send Test Event button once the HTTP webhook settings are set.End of Event records are sent as part of HTTP messages. They are not available in Milestone XProtect or in e-mail format.
Email notification configuration (optional):
This feature allows you to send alarms via e-mail to designated recipients.
IMPORTANT: Make sure that sender e-mail settings are already set! See the Sender configuration section for instructions.
- Enable snapshot attach: Off by default, sends a snapshot of the event in
.jpegformat. See the Snapshot part of the guide for its properties.
- Enable snapshot attach: Off by default, sends a snapshot of the event in
Enable Genetec Security Center integration (optional): Ticking this button to set a custom event ID is one of the steps necessary for sending alarms to Genetec Security Center. See the Genetec integration guide for detailed instructions.
Click the Submit button to save your settings.