Alarms
Alarms are processes for detecting incidents.
Click the Alarms menu on the left sidebar for this view.

Before you start
Please make sure that all Cameras are registered and activated in U-alarm.
Supported Alarms
Intrusion detection

An Intrusion detection alarm is triggered whenever a person is detected.
- Core technology: full body detection. The detection distance and the accuracy is much higher compared to head detection.
- Areas of interest can be defined.
- Send alarm notifications to third-party software.
Intrusion detection (PTZ)

An Intrusion detection (PTZ) alarm is triggered whenever a person is detected.
- Core technology: full body detection. The detection distance and the accuracy is much higher compared to head detection.
- Areas of interest can be defined.
- Send alarm notifications to third-party software.
Crowd detection

A Crowd detection alarm is triggered whenever number of the currently visible people reaches or exceeds a specific number. Multiple cameras can be associated to a single Crowd detection, in this case the sum of the people triggers the alarm. This use case is ideal for detecting the extreme size of a queue or for detecting a potentially dangerous situation in a safety zone.
- Core technology: head detection.
- Areas of interest can be defined on each camera.
- Send alarm notifications to third-party software.
- Multi camera support.
Crowd detection

A Crowd detection alarm is triggered whenever number of the currently visible people reaches or exceeds a specific number. Multiple cameras can be associated to a single Crowd detection, in this case the sum of the people triggers the alarm. This use case is ideal for detecting the extreme size of a queue or for detecting a potentially dangerous situation in a safety zone.
- Core technology: head detection.
- Areas of interest can be defined on each camera.
- Send alarm notifications to third-party softwares.
- Multi camera support.
Create a new alarm

Note: In this version only one type of the alarm can be used at the same time per device.
New Intrusion detection
- Click the New Alarm button.
- Choose Intrusion detection by clicking on its box. Fill in the form.
- Name: A readable name of this alarm. This name will appear in the Events view and in all notifications.
- Active: A running alarm can be deactivated here. Activated by default.
- Schedule of the alarm (optional): You can associate one of your previously defined Schedules with this alarm.
- Camera: Select one camera that should be observed by this alarm.

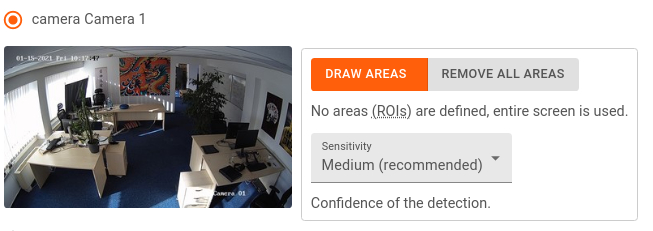
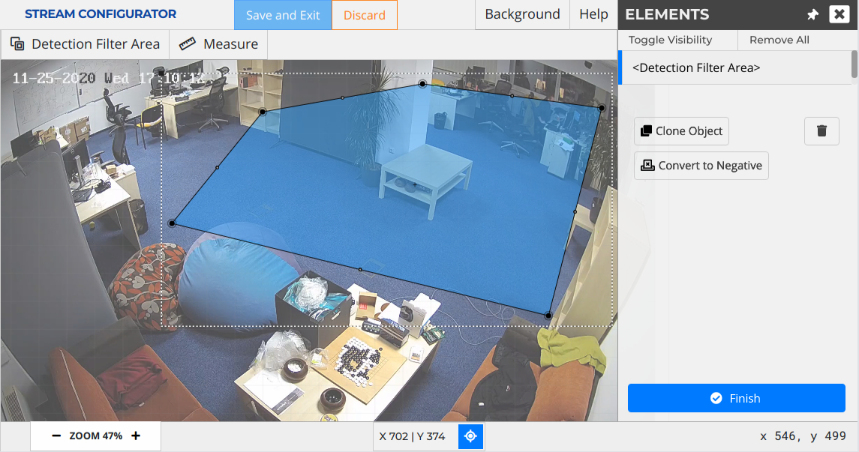
- Draw Areas (ROIs) /optional/: Sometimes the alarm should be limited to a specific area of the video. If you would like to observe only a specific area, it can be determined here. Clicking this button makes the Stream Configurator graphic editor appear. Without ROIs the entire video will be observed.
- Sensitivity: The sensitivity of the detector can be fine tuned here. Lowering the sensitivity causes less false alarms but decreases accuracy. Increasing it results in more alarms but may cause more false alarms as well.
Cooldown: After an alarm is triggered, it won't be triggered for the duration specified.
HTTP Client configuration (optional):
Use this feature to send triggered events to a third-party software. The following information should be provided by the third-party software's administrator:
- Enable HTTP client: Enables / disables event sending.
- Target url: The location of the API.
- Header key: Key of custom HTTP header.
- Header value: Value of custom HTTP header.
- Trust all certificates: If enabled, HTTPS certification errors will be ignored.
NOTE: Custom CA certificates can be uploaded in the Trusted Certificates setting.
Test Event: To test your integration you can click the Send Test Event button after the HTTP client settings are set.
Email notification configuration (optional):
This feature allows you to send alarms via e-mail to designated recipients.
IMPORTANT: Make sure that sender e-mail settings are already set! See the Sender configuration section for instructions.
Click the Save button to save your settings.
New Intrusion detection (PTZ)
To add an intrusion detection alarm for moving cameras, follow the steps as laid out in New Intrusion detection.
You can apply the same configuration options with one important difference: Only low resolution streams are available for PTZ intrusion detection alarms.
Note: Running algorithms for this type of alarm has high resource requirements - it is recommended to limit the TX2's use to a single camera. It is not recommended to combine this with other use cases (such as with static Intrusion detection). See some examples here.
New Crowd detection
- Click the Add Alarm button.
- Choose Crowd detection by clicking on its box. Fill the form.
- Name: A readable name of this alarm. This name will appear in the Events view and in all notifications.
- Active: A running alarm can be deactivated here. Activated by default.
- Schedule of the alarm (optional): You can associate one of your previously defined Schedules with this alarm.
- Critical number of people: This alarm will be triggered if the sum of the people (considering all associated cameras) reaches or exceeds this number.
- Camera: Check all cameras that should be observed by this alarm. At least one camera should be associated.

- Draw Areas (ROIs) /optional/: Sometimes the alarm should be narrowed to a specific area of the video. If you would like to observe only a specific area, it can be determined here. Clicking this button the Stream Configurator graphic editor appears. Without ROIs the entire video will be observed.
- Sensitivity: The sensitivity of the detector can be fine tuned here. Lowering the sensitivity causes less false alarms but decreases accuracy. Increasing it results in more alarms but may cause more false alarms as well.
Cooldown: After an alarm is triggered, it won't be triggered for the specified duration.
HTTP Client configuration (optional):
Use this feature to send triggered events to a third-party software. The following information should be provided by the third-party software's administrator:
- Enable HTTP client: Enables / disables event sending.
- Target url: The location of the API.
- Header key: Key of custom HTTP header.
- Header value: Value of custom HTTP header.
- Trust all certificates: If enabled, HTTPS certification errors will be ignored.
NOTE: Custom CA certificates can be uploaded in the Trusted Certificates setting.
Test Event: To test your integration you can click the Send Test Event button after the HTTP client settings are set.
Email notification configuration (optional):
This feature allows you to send alarms via e-mail to designated recipients.
IMPORTANT: Make sure that sender e-mail settings are already set! See the Sender configuration section for instructions.
Click the Save button to save your settings.
Edit an existing alarm
- On the left side of the view find and click the existing alarm you would like to modify in the Configured Alarms list.
- Edit your settings just like when this alarm was created.
- Click the Save button.
Delete an existing alarm
- On the left side of the view find and click the existing alarm you would like to modify in the Configured Alarms list.
- Click the Delete button.
Using the Stream Configurator

Basic Navigation
- Zoom with the mouse wheel.
- Pan by dragging the middle mouse button.
Drawing a new ROI
Select ROI tool from the top toolbar.
Define an area by simply clicking its nodes on the canvas.
- Each step can be undone with a right-click.
- Click on the starting point to finish the area (or double-click the last point).
The new Detection ROI in the Elements list.
You can draw more Areas. A video can have unlimited number of ROIs.
For most use cases that is enough. Click the Save and Exit button at the top of the screen or cancel all changes with the Discard button.
Negative Areas (optional)
Negative areas can be used when posters, billboards or other design elements contain people and these images cause false alarms. In a Negative Area all detections will be ignored.
- Double click a ROI (or select it from the Elements list).
- Click the Convert to Negative button. Clicking the button again will change the area back to positive.
- Click the Finish button at the bottom of the Elements box or click anywhere on the background to exit edit mode.
- The area is turned to red indicating that it is a Negative Area.
Edit an existing ROI
- Double click a ROI (or select it from the Elements list).
- On the canvas each node of the Area can be moved by mouse-dragging.
- New nodes can be created by clicking on the mid-point of a section of the Area.
- The entire Area can be moved by dragging the black square at the top-left corner of the bounding box.
- Click the Finish button at the bottom of the Elements box or click anywhere on the background to exit edit mode.
Delete an existing ROI
- Double click a ROI (or select it from the Elements list).
- Click the Trash button.
Other features
Elements
- The list of the created Areas are available here.
- You can hide the Elements box by clicking the X in the top right corner.
- The entire panel can be docked to the right or can be unattached by toggling the Pin button in the top bar.
Background
- The background image can be refreshed.
- The opacity of the background can be changed.
Next steps
You are most likely done with all mandatory settings. However, you can define Schedules for the alarms to only operate at specific times. Otherwise you can learn more about receiving Events.
